 3dwellbore.com
Please contact support@3dwellbore.com with any questions or comments.
Foreword

3dwellbore.com is currently under development and we value your feedback. Please drop us a note with any thoughts you may have at support@3dwellbore.com.
About 3dwellbore.com (What is this?)
In simple terms, this is a website that lets you view and interact with your wellbores in a three dimensional world. You can model the general wellbore path as well as tubulars such as casing, tubing, etc. While this is specifically aimed at production engineers, there are applications throughout the life of the well.
We are actively developing this, so contact us with suggestions or feature requests.
3dwellbore.com & 3dw.io
3dw.io is simply a shortened URL for 3dwellbore.com. This is shortened URL useful when synchronizing the view between a phone and a desktop in VR mode described below. 3dw.io links will be automatically expanded and redirected to 3dwellbore.com.
Basic Usage
Browser Support
3dwellbore.com is a modern HTML5 compliant website and requires a modern web browser to view. Browser support is ever changing, but the latest versions of Chrome & Firefox are generally supported. Safari on iOS 9+ is supported. Older versions of Internet Explorer (prior to version 11) are not supported. If your IT department requires outdated web browsers, please feel free to contact us for possible resolutions.
Demo Pages
We have constructed some demonstration pages with pre-loaded wellbores to aid in getting started.
http://3dwellbore.com/demo should bring up the following interactive wellbore:
http://3dwellbore.com/horizontal will bring up another example well.
Basic Interaction
Basic mouse interactions such as click/drag & mousewheel zoom are used to interact with the model

PC: Click/Drag to rotate, Mousewheel to zoom.

Mobile: Drag to rotate, pinch to zoom. Two finger drag to pan up/down the wellbore.
Corner Menus
Menus are provided and accessible through icons located at the corners of the screen.
These menus help manipulate the model and access advanced functionality. For example, you can set a casing size and color from the Markers menu.
- Top Left: Controls
- Bottom Left: Markers
- Top Right: Settings
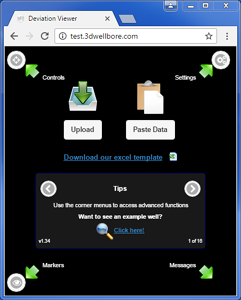
Survey Upload
In order to view your surveys, you must load the deviation survey. Deviation Surveys consist of 3 columns of data, commonly referred to as "Measured Depth", "Inclination", and "Azimuth". There are two ways to load this data into the viewer. You may upload a supported file directly, or you may cut & paste the data into the viewer.
Drag & Drop Support
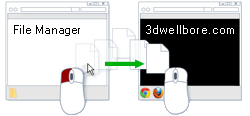
Drag & Drop your files onto the web browser, or click the upload button (also on the settings menu). Note: this is only applicable to desktop browsers as mobile devices do not support drag/drop.
Supported Files:
Rodstar (*.rsdx)  | SROD (*.inp6, *.inp6e, *.dev)
CSV Files (*.txt, *.csv) with the first 3 columns:
MeasuredDepth, Inclination, Azimuth
Data can be comma or tab delimited (be cautious of number format characters - see below).
Cut/Paste
For mobile devices or simple surveys, you can cut and paste the 3 columns (MD,INC,AZI) into the browser. On the default page, with no survey loaded, there will be an option to paste your survey data. Data can be comma or tab delimited, but must contain the entire data columns (i.e. multiple lines of 3 values each).
You can try cutting and pasting the following into the form on the home page:
0,0,0
1000,0,0
2000,45,0
3500,0,0
4000,90,20
5000,0,0
6000,20,45
8000,90,90
10000,0,0
You can also access the paste form through the settings menu at the top right
Number Formatting:
The upload form looks for either tabs or commas for the column delimiter. This can cause some issues if your depth column numbers are formatted with commas for the "thousands" separator. Furthermore, some regional number formatting rules can cause issues. Please see the Troubleshooting section below for more details, Particularly if the uploaded wellbore does not look correct.
Please ensure only periods are used to indicate decimal fractions, and remove all un-necessary numerical formatting characters. In particular, please ensure only commas or tabs are used to delimit the columns.
1234.56,15.25,321.98
1,234.56,15.25,321.98
1234,56,15,25,321,98
Advanced Usage
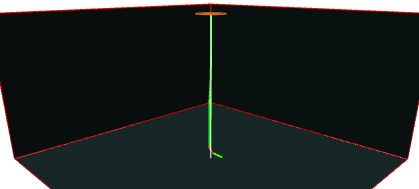
Navigation Helpers
True vertical - a white line is extended from the surface to the max TVD. Grey lines are drawn from the current focal point to the surface and to horizontally to the true vertical line.
Compass Circle - Whenever the model is moved, a circle is drawn around the current focus. This circle is horizontal and arrows extend vertically towards surface at each of the 4 cardinal directions. The white arrow indicates the direction to surface at north. In the bottom right display, the "Rad" value indicates the radius of the navigation circle as drawn.
Keyboard Shortcuts (Desktop)
Keyboard shortcuts help navigate and interact with the wellbore model. Some of these shortcuts are context aware and functionality might be altered depending on what mode the viewer is in
To focus the camera at a specific well depth, simply start typing using the number keys. Once you have the desired depth, press Enter to move the camera to that depth. Depths are limited to the total wellbore length. Use the Backspace key to delete digits.
spacebar: Repositions the camera rotation and alignment perpendicular & horizontal to the focal point on the wellbore.
When in VR desktop synchronization mode, the spacebar will trigger the heads up display on the VR viewer (i.e. phone)
X: Repositions the camera rotation and alignment perpendicular to the focal point on the wellbore. Similar to spacebar, but maintains the same camera elevation.
↑ ↓ up/down arrow keys: Move the camera focus up or down the wellbore.
shift: Move up/down by one foot, instead of the default 100ft movement per keystroke. Useful for close up and fine navigation.
ctrl: Orbit the camera view vertically around the focal point.
← → left/right arrow keys: Orbit the camera around the wellbore.
shift: Orient the view horizontal relative to the wellbore.
ctrl: Orient the view perpendicular to the tangent of the wellbore.
+ -: Zoom in or out.
Home End: Move the camera to the top or bottom of the wellbore. Maintains the current camera distance and angle.
B: Toggle background.
K: Toggle the surface marker. Useful for generating transparent images from the wellbore.
C: Toggle Casing visibility.
R: Toggle Rod visibility.
T: Toggle Tubing visibility.
V: Toggle Vertical Plane visibility.
H: Toggle Horizontal Plane visibility.
|: Toggle Twisted Plane visibility.
Mobile
The keyboard shortcuts listed above do not generally apply to supported mobile devices due to a lack of a physical keyboard.
Touch and hold for 2 seconds to toggle control interaction. This feature is context aware and depends on if you are in standard view mode or in VR mode. If you are in VR mode, touching the screen will pause forward motion and bring up the interactive menu display. Touch the screen again (via the VR viewer's button) to resume movement. Or you can select menu items by centering the circle on the item. Read more about the Virtual Heads Up Menu below.
Generate an Animated GIF
When viewing the models, it may be useful to generate an animation to include in emails or presentations. On the settings menu, select "Get Animation". This will bring up a form with some basic parameters for the generated animation. You must enter a valid email address, as the generated image file will be emailed to you. You can either "Preview" the animation, or "Process" it
How does this work? The animation process rotates the model 360° taking screen shots along the way. These screenshots are processed by out servers into an animated GIF and emailed to the address you provided.
Get a view link
When viewing the model, it may be useful to generate a link that will replicate the camera angle, position, and rotation. This is similar to the links used when sharing Google maps for example. Simply select the "Get Link" option from the settings menu. This link can be shared via email, text message, or other means. Anyone with the link can then view the model from the same perspective as when the link was generated.
See View Synchronization below for more info on view links.
VR Mode
Please consult the VR Quick Start Guide to learn the basics of using VR Mode.

![]() You appear to be on a mobile device.
You appear to be on a mobile device.
![]() Tablets are generally not compatible with VR viewer glasses.
Tablets are generally not compatible with VR viewer glasses.
![]() Your web browser or version may not be compatible.
Your web browser or version may not be compatible.
![]() Your device does not appear to support orientation controls.
Your device does not appear to support orientation controls.
![]() Your device supports orientation controls.
Your device supports orientation controls.
![]() Your web browser supports WebGL.
Your web browser supports WebGL.
![]() Your web browser does not appear to have WebGL enabled. Please see Toubleshooting below.
Your web browser does not appear to have WebGL enabled. Please see Toubleshooting below.
Cardboard Viewer
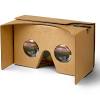
VR Mode requires the use of a supported phone and a viewer. You can obtain a viewer from a number of sources. Search google cardboard for viewers or on the official page. Feel free to contact us for assistance in selecting a viewer. Background on the Google Cardboard project can be found on Wikipedia or in this Wired article.
You can also see a list of recommended viewers and where to find them below.
Basic VR Usage

Once you have a compatible phone and viewer, simply rotate your phone to enter VR mode. You will be prompted to place your phone in the viewer. If you accidentally cancel this prompt, you can access it through the settings menu. You will know the phone is in VR mode by the split screen. Rotate the phone back to vertical to return to standard mode.
Virtual Menu

When looking through the viewer in VR mode the device orientation will move your avatar forward through the 3D space. Your viewer should have a simple button at the top right that will make contact with the screen. Pressing this button (or directly touching the screen) will pause forward motion and bring up a series of menu icons in the field of vision. To select a menu item, simply look directly at the icon. The selection circle will shrink and select the item after a short time period. This prevents accidental selection while looking around the scene. Press the viewer button (or touch the screen) to exit and resume forward motion.
Heads Up Menu:
 Hide the menu
 Reverse the camera direction (180°)
 Speed up forward motion through the world (fly faster or slower)
 Move to the top of the wellbore and look down
 Move to the bottom of the wellbore (Working on fixing the view direction...)
 Share your current view with remote viewers. See Desktop Synchronization
 Settings (more to come...)

Note: Some cardboard viewer buttons do not readily make contact with the screen when in the viewer. In some cases applying slight pressure to the back of the viewer (behind the phone) will allow the button to easily contact the screen.
Load your wellbore
You can load your own wellbore survey on a desktop browser and then get a shared link to bring up this model on your cell phone to use with the virtual reality viewer. The general process is as follows:
- Uploaded your wellbore survey via a desktop browser
- Select "View Link" from the settings menu
- From here there are 3 ways to open the viewer on your phone
- Use a QR code reader (Make sure your QR reader opens the page in the normal web browser (i.e. Safari on IOS, or Chrome on Android)
- Type the shortened URL manually into your phone's web browser
- Or, have our system send you an email with the link
- Once the link is open on your phone, you can also take advantage of view synchronization described below:
Desktop View Synchronization
Viewing the wellbore through the viewer allows for a full range of motion and intuitive navigation. For added utility, this view can be synchronized to a desktop and vice-versa. This allows collaborative interactions, and easy navigation to view unique wellbore perspectives. Once an interesting view is obtained through the viewer, you can further investigate the view using a higher resolution desktop, as well as the advanced model editing controls.
Desktop synchronization is available by default. Once you have a shared link open on both your phone and desktop, use the virtual reality viewer button to bring up the display menu. Select the bullhorn icon to start sharing your view. The desktop browser should prompt you that another user is trying to share the view. You can either "follow" the view with a direct synchronization, or you can overview the scene with a camera representation placed in the scene representing the VR viewer's position and direction.
Recommended VR Viewers
The official site for the google cardboard project has a list of officially supported viewers.

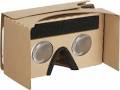
We have a limited number of branded cardboard viewers. Please send us an email and we might be able to ship you one. Please keep in mind that supplies are limited and delivery may be quicker with the other viewers listed below:
There is no shortage of suitable and inexpensive viewers. You can order many of them from Amazon or pick one up from a local retailer.

Basic Viewers:
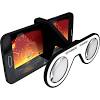
If you are in a hurry, Target has a nice compact viewer that easily fits in your pocket. If your phone has a bulky case, such as a battery pack, this might be a good option for you. The viewers below may require you to remove your phone from the case.


For a bit of nostalgia, ViewMaster has a decent all plastic viewer. The on-screen menu trigger button also functions fairly well compared to the cardboard viewers.

Advanced Viewers:

If you have a recent Samsung phone, the Galaxy VR is a good option. Extended navigation controls make this an ideal balance for cost and performance. Support for this viewer is in progress, so please let us know if you have any trouble.
HTC Vive & Oculus Rift should work, but due to the cost, we have not been able to thoroughly test on these platforms. If you have one of these VR devices, please let us know how they function with this site.
For general viewer questions, please email us at support@3dwellbore.com.
- Take frequent breaks while using Cardboard. If you experience nausea, discomfort, eye strain, or disorientation, immediately discontinue using Cardboard.
- Cardboard is not for use by children without adult supervision.
- Do not use Cardboard while driving, walking, or otherwise by being distracted from real world situations that prevent you from obeying traffic or safety laws. Do not drive or operate heavy machinery immediately after using Cardboard if you feel impaired or disoriented.
- If you have had or could be prone to seizures, consult a doctor before using Cardboard.
VR History

Disclaimer
3dwellbore.com is a self-funded, side project. As such, it is currently under development and no express or implied warranties are given. The information represented by this viewer may be inaccurate, incomplete, or misleading. Use of this site is revocable at any time, without notice. The site may be temporarily unavailable, the user interface or functionality is subject to change, and support is limited. If you are interested in learning more about this project, please feel free to contact us.
Contact
General Questions
For general questions or comments please email us at support@3dwellbore.com.
VR Viewer Questions
For questions regarding the virtual reality viewer, please email us at support@3dwellbore.com.
Investor Relations
We are not actively soliciting investment, but are happy to open a dialog. Perhaps you have a system that you would like to integrate with this viewer or would like to license the viewer for use within your organization? Please email us at support@3dwellbore.com.
Troubleshooting
Troubleshooting documentation is still under construction. In the meantime, please contact us at support@3dwellbore.com
Cannot view wellbores
Check you are using a recent version of a supported browser. Old versions of Internet Explorer are not compatible with modern web standards and may have trouble viewing. Please double-check the demo page at http://3dwellbore.com/demo and if you still have trouble, please contact us at support@3dwellbore.com and we will try and assist troubleshooting view issues.
Message: Limited 3D support
WebGL is rapidly becoming a standard for web browsers. In some cases your system or browser may not support this technology. We have tried to support a limited subset of features for older browsers, but this may not be thoroughly tested. If you receive a notice about "Limited 3D support", please try upgrading your browser. You can always contact support@3dwellbore.com for further assistance.
Message: Survey Depth Error
Incorrect column order: The system expects the wellbore survey in the following order:
MD,INC,AZI
If the deepest measured depth is less than 360, it is likely the column ordering was incorrect (Inclinations are less than 90° and Azimuths are less than 360°). If you see this error, please verify the column ordering is correct. If your wellbore is less than 360 ft (or meters), you can disregard this warning.
Note: The rendered wellbore will likely be illegible in this case.
Number Format: Number formatting characters can vary internationally. In particular, the thousands separator in the US is the comma. One thousand can be represented as 1000 or 1,000. In this case the comma is simply ignored as a non-critical number formatting character. Some regions use the period to separate thousands, which appears as 1.000. Unfortunately that creates an ambiguity as to whether that means one, or one thousand. Please ensure that the number text in the survey data uses periods only to denote decimal fractions. Remove any non-critical number format characters.
Note: The rendered wellbore will look reasonably accurate in this case. The scale, however will be off by a factor of 1000.
Supported Devices
There are a vast number of devices and functionality may vary. If you run into an issue, please let us know. We have a few devices that we can test against and have listed them here. Please note that this is not a complete list of supported devices, only the devices we have on-hand to test.
Generally, the latest version of iOS and Android are supported. Relatively recent hardware is preferred, but
iOS:- iPhone 6, iOS 10.2
- iPhone 4S, iOS 9.2
- iPad Air, iOS 10.2
- Samsung Galaxy Note 3, Android 5.0
- Samsung Galaxy Tab 2 (2012) Android 4.2
- Kindle Fire (5th gen.), OS 5.3.2.1
- Chrome & Firefox are tested, but other browsers may work as well.